I. Java2D graphics allows a programmer to represent objects in user
coordinates and then transform user coordinates to pixels.
A. Java AWT package is an integer, pixel-based model.
B. Java2D graphics is a real-number, user-coordinate based model
C. Other enhancements over the AWT
1. Arbitrary line sizes
2. Arbitrary line styles
3. Three types of fill options
a. solid colors
b. gradiant colors
c. texture fills
4. Area objects that use boolean operations to form complex objects
out of simpler objects
II. Use information
A. java.awt.geom: package name for the java 2D graphics package
B. Graphics2D class: A subclass of Graphics that implements many of the
Java2D drawing and context setting commands.
1. Downcast the Graphics object passed in as a parameter to
paintComponent to Graphics2D
C. Rendering methods
1. draw: renders the outline of any geometry primitive, using the
stroke and paint attributes
2. fill: renders any geometry primitive by filling its interior
with the color or pattern specified by the paint attribute.
III. New Objects:
A. Point2D, Dimension2D: Location and size objects
1. Point2D and Dimension2D are abstract classes. Each class has two
static, nested subclasses that allow for the creation of
float or double objects. For example, Point2D has
Point2D.
B. Shape interface.
1. Useful methods
a. contains(Point2D or Rectangle2D or x,y): indicates whether the
Shape contains the indicated object: good for determining if
the shape contains a mouse point
b. intersects(Rectangle2D or x,y,w,h): indicates whether the
Shape intersects the indicated rectangle: good for determining
if the Shape intersects a clipping region
2. Useful objects that implement the Shape interface
b. Rectangle2D
c. RoundRectangle2D
d. Line2D
e. Ellipse2D
f. Arc2D
1. Uses degrees, not radians. The rest of the Java2D package
uses radians.
2. Positive degrees are measured in a counter-clockwise direction
3. Three types
a. pie: draws the entire portion of the circle represented by
the arc
b. chord: only draws an arc that is closed by drawing a line
segment between the start and end arc segments. When the
draw method is used, the line segment is drawn.
c. open: similar to chord except that when the draw method is
used, the line segment is not drawn
4. setArcByCenter(centerX, centerY, radius, start angle, angle
extent, arc type): this method is the best one to use to
set an arc's attributes. Note that an arc is defined by
a start angle and an angle extent rather than a start angle
and an end angle.
j. Area: Allows you to combine simple shapes into more complicated
shapes using intersection, union, subtraction, and exclusive or.
1. Resulting shape can be filled and/or stroked
2. Resulting shape has intersection and contains tests
3. Composition methods
a. intersect(Area)
b. subtract(Area): difference operation
c. add(Area): union operation
d. exclusiveOr(Area) = add - intersect: effectively the
same as taking the union of two objects and then
removing their intersected area
IV. Image Handling: Java provides an abstract Image class that defines basic
methods for manipulating images. However, most images that you create
will be BufferedImages. BufferedImages provides a mutable image buffer
that may be written to using a Graphics object. You can draw a BufferedImage
directly to the screen using the drawImage command. Unfortunately,
Java's Swing components that can display an image, such as a JLabel, cannot
handle Images directly. Instead the Swing components want to be passed
an Icon object. An Icon is an interface defined by Java for use by Swing
components. The ImageIcon class is the most common instantiation for an
Icon object, and is basically a container object for an Image.
A. Loading Image Objects: You can load an image either by creating an
ImageIcon or by using the ImageIO class to read an image
1. ImageIcon: This is the easy way to load an image, although it may
not be the recommended way. The Java docs do not suggest a recommended
way so I usually go this route because the code is simpler:
Image bvzImage = new ImageIcon("/home/bvz/www-home/bvz.gif").getImage();
BufferedImage bimage = (BufferedImage)bvzImage;
The above code is not guaranteed to be safe but an image is almost
invariably a BufferedImage so the downcast is almost always safe.
If you want to be absolutely sure you can use the instanceof test
as follows:
Buffered Image bimage = null;
if (bvzImage instanceof BufferedImage)
bimage = (BufferedImage)bvzImage;
else {
bimage = new BufferedImage(bvzImage.getWidth(),
bvzImage.getHeight(),
BufferedImage.TYPE_INT_ARGB);
// get a graphics2D object that will allow us to write into the
// buffered image.
Graphics2D bimageg = bimage.createGraphics();
bimageg.drawImage(bvzImage, 0, 0, null);
}
2. ImageIO:
import java.io.File;
import javax.image.ImageIO;
...
BufferedImage image = null;
try {
image = ImageIO.read(new File("/home/bvz/www-home/bvz.gif"));
} catch (IOException e) {
System.out.println(e);
System.exit(1);
}
III. Line Styles
A. Java2D introduces a new interface called Stroke and a new
class called BasicStroke for implementing line styles
1. Graphics2D.setStroke(Stroke): sets the stroke attribute to the
indicated stroke object
B. Stroke attributes
1. line width: the thickness of a line
2. join style: the decoration applied when two lines meet
a. options
i. join_bevel: Joins lines by connecting the outer corners of
their edges with a straight segment
ii. join_miter: Joins lines by extending their outside edges
until they meet.
iii. join_round: Joins lines by rounding off the corner at a
radius of half the line width.
b. when join_miter is specified you also need to specify
something called a miter limit. The
miter limit specifies the maximum extend for this joining
(i.e., for the length of the miter). If the miter would exceed
this limit, then java trims the miter so that it becomes a
bevel. See the java docs for more information.
3. end-cap style: the decoration applied at the end of a line
segment (it does not intersect anything)
a. options
i. cap_butt: Ends lines and dash segments with no added
decoration
ii. cap_round: Ends lines and dash segments with a round
decoration that has a radius equal to half of the line width
iii. cap_square: Ends lines and dash segments with a square
projection that extends beyond the end of the segment to
a distance equal to half of the line width
4. dash style: the pattern of opaque and transparent sections applied
along the length of a line
a. dash array: defines the dash pattern. Alternating elements
in the array represent the dash length and the length of the
space between dashes in user coordinate units. Element 0
represents the first dash, element 1 the first space, and so
on.
i. Java treats its array index as a counter that monotonically
increases. It mods the counter by the size of the array to
find its next dash length. That means that if the size of
the array is odd, then the dashes will look odd. For example,
if the array is {10.0f, 2.0f, 5.0f} then the first three
parts of the line will be as expected--a dash of length
10, a space of length 2, and a dash of length 5. However,
the index will now wrap around to the beginning of the
array so the next three parts will be a space of length 10,
a dash of length 2, and a space of length 5.
ii. Moral: make the length of your dash array be even
iii. Exception: if you want equal length dashes and spaces
then you only need an array of length 1. For example,
a dash array of {10.0f} will create dashes and spaces
that are each 10 units long.
b. dash phase: an offset into the dash pattern, also specified in
user coordinate units. The dash phase indicates what part of
the dash pattern is applied to the beginning of the line. For
example, if the dash array is {10.0f, 15.0f, 5.0f} and the
dash phase is 5.0f, then the line will start with a dash of
length 5, followed by a space of length 15, etc. Similarly if
the dash phase is 20, then the line will start with a space
of length 10 (omitting the dash of length 10 and the first
5 units of the space), then a dash of length 5, then a space
of length 10 (because the dash index wraps to the beginning
of the array).
C. Commonly used constructors for BasicStroke
1. BasicStroke(float width): Constructs a solid BasicStroke with the
specified line width and with default values for the cap and join
styles.
2. BasicStroke(float width, int cap, int join)
3. BasicStroke(float width, int cap, int join, float miterlimit)
4. BasicStroke(float width, int cap, int join, float miterlimit,
float[] dash, float dash_phase)
IV. Fill Styles
A. Paint interface: interface implemented by the three types of fill
objects
1. Graphics2D.setPaint(Paint): sets the paint attribute to the
indicated paint object
2. Types of fill objects
a. Color
b. GradientPaint(P1, C1, P2, C2, cyclic?)
i. the user specifies two points, P1 and P2, in user space
and associates a color, C1 and C2, with each point.
Colors can be arbitrary colors (e.g., red to white or
red to blue).
ii. Java proportionately changes the color on the P1-P2 line
segment from C1 to C2
iii. The color of points on the extension to the line segment
depend on whether the gradient paint's cycle parameter
is true or false
1) true (i.e., cyclic): The colors repeat themselves in
reverse. For example, after going from C1 to C2, the
color will reverse itself and go from C2 to C1, then
from C1 to C2, etc.
2) false (i.e., acyclic): Any point before P1 is colored
C1 and any point after P2 is colored C2
iv. Color of points that do not lie on the line
1) draw an imaginary perpendicular line from the point
to the P1-P2 line (or to its extension).
2) The color at the point where the imaginary line
intersects the line segment or its extension is
the color assigned to the point.
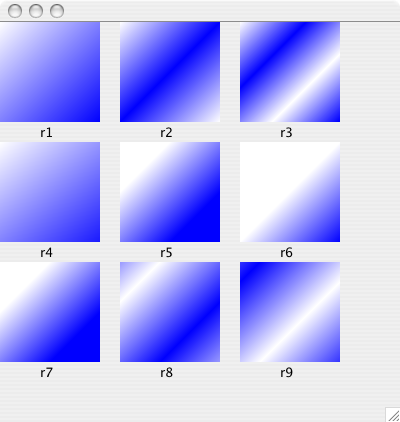 Example: The picture to the left was drawn using
frame.java.
r1, r2, and r3 are all drawn with cyclic gradient
paints.
r1: the line goes from the upper left corner to
the lower right corner
r2: the line goes from the upper left corner to the center.
Note how the color reverses at the center
r3: the line goes from the upper left corner to 1/3 of
the way into the rectangle. Note that there are two
color reversals (white to blue, blue to white, white
to blue).
r4, r5, and r6 are drawn with acyclic gradient paints.
r4: the line goes from the upper left corner to the
lower right corner. r4 and r1 look identical because
there is no repetition.
r5: the line goes from the 1/4 to 3/4 point of the
rectangle. Note that the color is completely white
before the 1/4 point and complete blue after the 3/4
point.
r6: the line goes from the center of the rectangle to the
bottom right corner. Note that the color is completely
white before the center of the rectangle.
r7: r7 is drawn with the same acyclic gradient paint as
r5. Note how you can determine the color of a point
by drawing an imaginary perpendicular line from the
point to the line segment used to specify the gradient
paint.
r8, r9: both r8 and r9 are drawn with a cyclic gradient
paint that goes from (0, 0) to (50, 50). Note the
alternation of colors and the unpredictability of what
will be drawn.
Bottom Line: When using a gradient paint you will normally want
to anchor it at the same points where the object is
being drawn
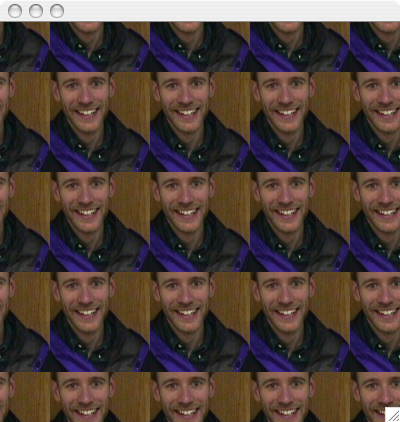
c. TexturePaint(BufferedImage image, Rectangle2D anchorRect): A
texture paint object scales the image to the size of the
anchorRect and starts drawing on the screen at the anchor
rectangle's position. Additional rectangles are replicated
in each direction from the anchor. Note that the location
of the anchor rectangle specifies a position on the screen,
not an offset into the image.
i. Generally it is a good idea to start texturing at the upper,
left corner of the object, otherwise the results may
be unpredictable.
ii. In order to creat a BufferedImage you need to:
1) create a BufferedImage object with one of the predefined
ways of interpreting the image (typically you will
use BufferedImage.TYPE_INT_ARGB)
2) request a Graphics2D object from the BufferedImage object
using the createGraphics command
3) draw images, colors, etc. into the BufferedImage using
the fill, draw, drawImage, and drawString commands of
the graphics object
Example: the picture below was drawn by texture.java.
Example: The picture to the left was drawn using
frame.java.
r1, r2, and r3 are all drawn with cyclic gradient
paints.
r1: the line goes from the upper left corner to
the lower right corner
r2: the line goes from the upper left corner to the center.
Note how the color reverses at the center
r3: the line goes from the upper left corner to 1/3 of
the way into the rectangle. Note that there are two
color reversals (white to blue, blue to white, white
to blue).
r4, r5, and r6 are drawn with acyclic gradient paints.
r4: the line goes from the upper left corner to the
lower right corner. r4 and r1 look identical because
there is no repetition.
r5: the line goes from the 1/4 to 3/4 point of the
rectangle. Note that the color is completely white
before the 1/4 point and complete blue after the 3/4
point.
r6: the line goes from the center of the rectangle to the
bottom right corner. Note that the color is completely
white before the center of the rectangle.
r7: r7 is drawn with the same acyclic gradient paint as
r5. Note how you can determine the color of a point
by drawing an imaginary perpendicular line from the
point to the line segment used to specify the gradient
paint.
r8, r9: both r8 and r9 are drawn with a cyclic gradient
paint that goes from (0, 0) to (50, 50). Note the
alternation of colors and the unpredictability of what
will be drawn.
Bottom Line: When using a gradient paint you will normally want
to anchor it at the same points where the object is
being drawn
c. TexturePaint(BufferedImage image, Rectangle2D anchorRect): A
texture paint object scales the image to the size of the
anchorRect and starts drawing on the screen at the anchor
rectangle's position. Additional rectangles are replicated
in each direction from the anchor. Note that the location
of the anchor rectangle specifies a position on the screen,
not an offset into the image.
i. Generally it is a good idea to start texturing at the upper,
left corner of the object, otherwise the results may
be unpredictable.
ii. In order to creat a BufferedImage you need to:
1) create a BufferedImage object with one of the predefined
ways of interpreting the image (typically you will
use BufferedImage.TYPE_INT_ARGB)
2) request a Graphics2D object from the BufferedImage object
using the createGraphics command
3) draw images, colors, etc. into the BufferedImage using
the fill, draw, drawImage, and drawString commands of
the graphics object
Example: the picture below was drawn by texture.java.