Time to look beneath the hood. While the standard template library is a great tool, it's important to understand how dynamic data structures like lists and trees are actually implemented. We'll start with two simple data structures -- Stacks and Queues -- and how we implement them without any help from the standard template library. We then demonstrate how to implement doubly linked lists, which is how the STL list data structure is implemented.
One of the nice parts of the standard template library is that it works with all data types. We'll learn about templates later. For this lecture, we're going to pare it down, and have our data structures only hold strings.
Stacks
A stack is a "LIFO" -- "Last in, first out" data structure. It supports two main operations:
- void Push(const string &s): The adds a string to the stack.
- string Pop(): This returns the most recently added string, removing it from the stack at the same time.
The full stack API is in include/stack.hpp:
#pragma once
#include <string>

/* Ignore the Stacknode class for now.  I'll get around to it when we need it. */

class Stacknode {
  friend class Stack;
  protected:
    std::string s;
    Stacknode *next;
};

/* Here is the stack class.  This is a data structure that holds strings in a
  "Last in, first out" manner.  */

class Stack {
  public:

    Stack();                               // Regular constructor
    Stack(const Stack &s);                 // Copy constructor
    Stack& operator= (const Stack &s);     // Assignment overload
    ~Stack();                              // Destructor
    void Clear();                          // Clear it out

    void Push(const std::string &s);   // This puts a string on the stack.
    std::string Pop();                 // This removes a string from the stack.

    bool Empty() const;                // These return information about the stack.
    size_t Size() const;
  protected:
    Stacknode *top;                    // This is how the stack is implemented.
    size_t size;
};
|
Ignore the "Stacknode" stuff for now. Just concentrate on the public methods for the stack. Besides the Push() and Pop() methods, there are straightforward Clear(), Empty() and Size() methods, plus the full complement of constructors, destructor and assignment overload.
A simple application that uses a stack is a program that reverses standard input -- you read each line and push it onto a stack, and then pop each string from the stack, printing as you go. The code is in src/stack_rev.cpp:
#include "stack.hpp"
#include <iostream>
using namespace std;

int main()
{
  string s;
  Stack st;

  /* Create the stack with every line of standard input. */

  while (getline(cin, s)) st.Push(s);

  /* Now, pop each string off the stack and print it out.
     This will print standard output in reverse order. */

  while (!st.Empty()) cout << st.Pop() << endl;

  return 0;
}
|
It's nice when a data structure so naturally fits an application. That's some clean code. It works:
UNIX> head -n 5 txt/input.txt
 0  John Eighth
 1  Tristan Passenger
 2  Joshua Classroom
 3  Oliver Andrew Propagandist
 4  Tristan Tristan Hieratic
UNIX> head -n 5 txt/input.txt | bin/stack_rev
 4  Tristan Tristan Hieratic
 3  Oliver Andrew Propagandist
 2  Joshua Classroom
 1  Tristan Passenger
 0  John Eighth
UNIX>
Implementation
Now let's look at the implementation. Each value that gets stored on the stack is going to be stored in a single instance of the Stacknode class, which we'll revisit here (it was defined above in include/stack.hpp).
class Stacknode {
  friend class Stack;       // This means that Stack methods can use the protected variables
  protected:
    std::string s;
    Stacknode *next;
};
|
First, the "friend" designation is a way for one class (here the Stacknode class) to allow other classes (here the Stack class) to use the first class' protected variables and methods. I won't talk about it further -- it's a nice feature.
You'll note that one protected member variable of the stack is a pointer to a Stacknode, called top. This is going to point to a Stacknode whose string s is the last string that was pushed onto the stack. The Stacknode's pointer next is going to point to the string that was pushed before the most recent one, and so on. The final Stacknode's next pointer will be NULL. If the stack is empty, then top will be NULL
For example, suppose we do:
Stack st;

st.Push("Give");
st.Push("Him");
st.Push("Six");
|
Our stack is going to look as follows:
 |
The reason that we have this structure is that it facilitates adding new Stacknode's via Push(), and removing them via Pop(). Let's consider Push(). Here's the code (in stack.cpp):
/* Push allocates a new node, whose pointer points to the current top of the stack.
   Then, it sets the top of the stack to this new node. */

void Stack::Push(const string &s)
{
  Stacknode *newnode;

  newnode = new Stacknode;
  newnode->s = s;
  newnode->next = top;
  top = newnode;
  size++;
}
|
What this does is create a new node with the given string, and hook that node on to the top of the stack. Consider calling Push("Now") on the stack above. We'll go through each step:
 |
 |
 |
When Push() returns, the variable newnode goes away, and we are left with a stack that has "Now" on top:
 |
Pop() on the other hand, needs to store the string that is on the first node, remove that node from the stack, and return the stored string. Since Push() called new, Pop() must call delete. Otherwise, our stack implementation will have a memory leak.
Here's the code:
/* Pop "unhooks" the top node from the stack, sets s to the string on top,
   and then deletes it.  It throws an exception if the stack is empty.
   That is because it's the user of the stack making a mistake, and throwing
   the exception is a clean way of handling the error. */

string Stack::Pop()
{
  string rv;
  Stacknode *oldtop;

  if (top == NULL) throw((string) "Stack::Pop() called on an empty stack");

  oldtop = top;
  top = oldtop->next;
  rv = oldtop->s;
  delete oldtop;

  size--;
  return rv;
}
|
And below we step through Pop() called on the original three-node stack:
 |
 |
 |
When we're done, we return "Six" to the caller, and our stack only has two elements:
 |
Be sure you understand how these two methods work. Understanding linked data structures is a fundamental concept, and this is the easiest example. You need to understand it before you can move on.
The regular constructor, Empty() and Print() are straightforward:
Stack::Stack()
{
  top = NULL;
  size = 0;
}
|
bool Stack::Empty()
{
  return (size == 0);
}
|
size_t Stack::Size()
{
  return size;
}
|
The other methods are a little subtle. Let's first concentrate on Clear(), which converts a potentially non-empty stack to an empty one. I could implement Clear() very easily:
void Stack::Clear()
{
  while (!Empty()) (void) Pop();
}
|
However, I'm going to implement it more efficiently, without making all of those method calls. Instead, I'm going to keep deleting the top of the stack until there are no more nodes on the stack. You'll note, I need the next variable to keep track of the "next" node, because after I delete top, top is no longer a valid pointer:
void Stack::Clear()
{
  Stacknode *next;

  while (top != NULL) {
    next = top->next;
    delete top;
    top = next;
  }
  size = 0;
}
|
Why do we need a destructor?
If our stack is non-empty, then it has pointers to memory allocated with new. Here's our standard example: |
Now, suppose st is a local variable. When the procedure/method goes out of scope, the destructor is called on st, and if we haven't written a custom destructor, this is what happens:
 |
To fix this, just have the destructor call Clear(). That turns the stack into the following, empty stack, and now there is no memory leak:
Here's the destructor code:
Stack::~Stack()
{
  Clear();
}
|
We'll stop here, and check that src/stack_rev.cpp works:
UNIX> make bin/stack_rev
g++ -std=c++98 -Wall -Wextra -Iinclude -c -o obj/stack_rev.o src/stack_rev.cpp
g++ -std=c++98 -Wall -Wextra -Iinclude -c -o obj/stack.o src/stack.cpp
g++ -std=c++98 -Wall -Wextra -Iinclude -o bin/stack_rev obj/stack_rev.o obj/stack.o
UNIX> head -n 5 txt/input.txt
 0  John Eighth
 1  Tristan Passenger
 2  Joshua Classroom
 3  Oliver Andrew Propagandist
 4  Tristan Tristan Hieratic
UNIX> head -n 5 txt/input.txt | bin/stack_rev
 4  Tristan Tristan Hieratic
 3  Oliver Andrew Propagandist
 2  Joshua Classroom
 1  Tristan Passenger
 0  John Eighth
UNIX>
You'll note, this does call the destructor, when main() returns.
The Assignment Overload
As with all data structures, you need to evaluate whether or not you need a copy constructor and assignment overload. To help you think about this, let's look at what happens with no assignment overload. Consider our example stack: |
If we assign st to another variable, st2, what happens is a disaster waiting to occur:
 |
To illustrate this with an example program, take a look at src/stack_overload.cpp:
#include "stack.hpp"
#include <iostream>
using namespace std;

/* This program demonstrates the assignment overload in action. */

int main()
{
  string s;
  Stack s1, s2;

  /* Read standard input into a stack. */

  while (getline(cin, s)) s1.Push(s);

  /* Copy the stack and clear out the original stack */

  s2 = s1;
  s1.Clear();

  /* Print the copied stack */

  while (!s2.Empty()) {
    cout << s2.Pop() << endl;
  }
  return 0;
}
|
When we say "s2 = s1", and we don't implement an assignment overload, then s2 gets a copy of s1's member variables, which means a copy of size and a copy of top. Now you have two data structures pointing to the same memory (s1.top and s2.top), which is a problem. Why? Well, what happens when one of them deletes top? Then the other one has a stale pointer.
To highlight that, I have copied:
- include/stack.hpp to include/stack_no_ao_or_cc.hpp.
- src/stack.cpp to src/stack_no_ao_or_cc.cpp.
- src/stack_overload.cpp to src/stack_overload_naoc.cpp
- s2 is a copy of s1, which means that s2.top equals s1.top.
- s1.Clear() is called, which means that s1.top is deleted.
- When s2.Pop() is called, it uses s2.top, which is no longer a valid pointer. This is when you get the error.
UNIX> make bin/stack_overload_naoc
g++ -std=c++98 -Wall -Wextra -Iinclude -c -o obj/stack_overload_naoc.o src/stack_overload_naoc.cpp
g++ -std=c++98 -Wall -Wextra -Iinclude -c -o obj/stack_no_ao_or_cc.o src/stack_no_ao_or_cc.cpp
g++ -std=c++98 -Wall -Wextra -Iinclude -o bin/stack_overload_naoc obj/stack_overload_naoc.o obj/stack_no_ao_or_cc.o
UNIX> bin/stack_overload_naoc < txt/input.txt
stack_overload_naoc(85803,0x7fff7ea10000) malloc: *** error for object 0x7fe91ac03530: pointer being freed was not allocated
*** set a breakpoint in malloc_error_break to debug
Abort
UNIX>
In src/stack.cpp, we implement the assignment overload. As the comment says, it's a little tricky -- what we do is make a temporary stack, which contains the original stack in reverse order. Then we pop all of the nodes off the temporary stack, which copies them in their original order:
/* The assignment overload is tricky.  Since we can only traverse the stack
   from top to bottom, what we do is create a temporary stack, which has nodes in
   reverse order, and then we pop all of its nodes, and push them onto our
   returning stack. */

Stack& Stack::operator= (const Stack &s)
{
  Stack tmp;
  Stacknode *sn;

  /* First we call clear, because the stack may already have elements in it. */

  Clear();

  /* Next, we create the temporary stack */

  for (sn = s.top; sn != NULL; sn = sn->next) tmp.Push(sn->s);

  /* And finally we pop nodes off the temporary stack and onto this stack. */

  while (!tmp.Empty()) Push(tmp.Pop());
  return *this;
}
|
Now, bin/stack_overload works properly:
UNIX> make bin/stack_overload
g++ -std=c++98 -Wall -Wextra -Iinclude -c -o obj/stack_overload.o src/stack_overload.cpp
g++ -std=c++98 -Wall -Wextra -Iinclude -c -o obj/stack.o src/stack.cpp
g++ -std=c++98 -Wall -Wextra -Iinclude -o bin/stack_overload obj/stack_overload.o obj/stack.o
UNIX> head -n 5 txt/input.txt | bin/stack_overload
 4  Tristan Tristan Hieratic
 3  Oliver Andrew Propagandist
 2  Joshua Classroom
 1  Tristan Passenger
 0  John Eighth
UNIX>
This implementation is inefficient, because it calls all of those methods. Like the implementation of Clear(), I could implement the assignment overload without calling any methods, and make it more efficient. I'm not going to do that here, because I think this lecture is complicated enough; however, put it in the back of your mind.
It's very important that you understand why I'm calling Clear() at the beginning of the assignment overload. When I call:
s2 = s1;
To illustrate this, take a look at the program src/stack_overload_2.cpp
#include "stack.hpp"
#include <iostream>
using namespace std;

/* This program demonstrates why you have to call Clear() inside the assignment overload*/

int main()
{
  string s;
  Stack s1, s2;

  /* Read standard input into a stack. */

  while (getline(cin, s)) s1.Push(s);

  /* Copy the stack twice. The second one should overwrite the first one. */

  s2 = s1;
  s2 = s1;

  /* Print the copied stack.  It should only print the stack once. */

  while (!s2.Empty()) cout << s2.Pop() << endl;

  return 0;
}
|
You'll note that the second time I call "s2 = s1", s2 already has elements in it. If I don't call Clear() in the assignment overload implementation, then it will add s1 twice.
I compile this with src/stack.cpp into the executable bin/stack_overload_2, and it works correctly, because Clear() is called:
UNIX> head -n 2 txt/input.txt | bin/stack_overload_2
 1  Tristan Passenger
 0  John Eighth
UNIX>
However, in src/stack_bad_overload.cpp, I have copied src/stack.cpp, and deleted the Clear(). Now, you get two copies of s1 in s2, because s2 is not cleared:
UNIX> make bin/stack_overload_2_bad
g++ -std=c++98 -Wall -Wextra -Iinclude -c -o obj/stack_overload_2.o src/stack_overload_2.cpp
g++ -std=c++98 -Wall -Wextra -Iinclude -c -o obj/stack_bad_overload.o src/stack_bad_overload.cpp
g++ -std=c++98 -Wall -Wextra -Iinclude -o bin/stack_overload_2_bad obj/stack_overload_2.o obj/stack_bad_overload.o
UNIX> head -n 2 txt/input.txt | bin/stack_overload_2_bad
 1  Tristan Passenger
 0  John Eighth
 1  Tristan Passenger
 0  John Eighth
UNIX>
The Copy Constructor
Without a custom copy constructor, the same disaster that happened with the assignment overload will happen with the copy constructor. It's the same picture as above. So we have to write a custom copy constructor.We're going to use the assignment overload to implement the copy constructor, but remember, when the copy constructor is called, all of the member variables (size and top) are uninitialized. So, we need to set up enough of the member variables for the assignment overload to work. The first thing that the assignment overload does is call Clear(), and you'll note that the only member variable that Clear() accesses is top. So, setting up top to be NULL is the only thing that we need to do before calling the assignment overload.
Stack::Stack(const Stack &s)
{
  top = NULL;
  *this = s;
}
|
To test it, take a look at src/stack_copy.cpp:
#include "stack.hpp"
#include <iostream>
using namespace std;

/* This program demonstrates the copy constructor in action. */

void Print_Stack(Stack st)
{
  while (!st.Empty()) cout << st.Pop() << endl;
  cout << endl;
}

int main()
{
  string s;
  Stack st;

  /* Create a stack from the lines of standard input. */

  while (getline(cin, s)) st.Push(s);

  /* Print it twice, using a procedure, which calls the copy constructor twice. */

  Print_Stack(st);
  Print_Stack(st);
  return 0;
}
|
When we run it, you see that it does indeed print the stack twice, so the copy constructor is in working order:
UNIX> make bin/stack_copy
g++ -std=c++98 -Wall -Wextra -Iinclude -c -o obj/stack_copy.o src/stack_copy.cpp
g++ -std=c++98 -Wall -Wextra -Iinclude -c -o obj/stack.o src/stack.cpp
g++ -std=c++98 -Wall -Wextra -Iinclude -o bin/stack_copy obj/stack_copy.o obj/stack.o
UNIX> head -n 5 txt/input.txt | bin/stack_copy
 4  Tristan Tristan Hieratic
 3  Oliver Andrew Propagandist
 2  Joshua Classroom
 1  Tristan Passenger
 0  John Eighth

 4  Tristan Tristan Hieratic
 3  Oliver Andrew Propagandist
 2  Joshua Classroom
 1  Tristan Passenger
 0  John Eighth

UNIX>
Queues
If any of that Stack description was unclear to you, go over it again. If it's still unclear, ask me about it in class, or ask your TA about it during their office hours. I know I'm repeating myself -- this is fundamental material, and you need to understand it before proceeding.A queue is a FIFO data structure: first-in, first-out. It can be used to mimic lines at the grocery store, or cars waiting at a traffic light. The Queue API (in include/queue.hpp) is pretty much identical to the Stack API. It works differently, though, because Pop() now removes the oldest element of the queue, rather than the newest.
#pragma once
#include <string>

/* This defines the nodes of the queue.  It's only used internally to
   the queue, but we have to define it here.  */

class Qnode {
  friend class Queue;
  protected:
    std::string s;
    Qnode *ptr;
};

/* Here's the Queue class. */

class Queue {
  public:

    /* Constructors, Destructor, Assignment Overload */

    Queue();
    Queue(const Queue &q);
    Queue& operator= (const Queue &q);
    ~Queue();

    /* Same operators as stacks. */

    void Clear();
    bool Empty() const;
    size_t Size() const;

    /* Push puts the string on the end of the queue,
       and Pop removes the string from the beginning of the queue. */

    void Push(const std::string &s);
    std::string Pop();

  protected:
    Qnode *first;           // Pointer to the first node on the queue.
    Qnode *last;            // Pointer to the last node on the queue.
    int size;               // The queue's size.
};
|
The protected data is different, too. Now you are going to keep a pointer to the first and last nodes on the queue. If the queue is empty, then both will be NULL.
Each Qnode has a pointer called ptr, which points to the previous node on the queue. The anology here is that if you are in line, you point to the person behind you, not the person in front of you. The reason is that this way you can insert new nodes behind the last one, and you can delete the first node.
Let's take an example like the stack example:
Queue q;

q.Push("Give");
q.Push("Him");
q.Push("Six");
|
This is going to result in the following layout of data:
 |
Let's first consider calling Pop(). The code is nearly exactly like the stack code, only we are removing the first node rather than the top node, and we have to put some extra code in to handle popping the last node on a queue. The code is in src/queue.cpp
/* Pop is actually very similar to the stack code.
   You save the first string, save a pointer to the first node,
   set "first" to point to the next node, and delete the first node. */

string Queue::Pop()
{
  Qnode *oldfirst;
  string rv;

  if (size == 0) throw((string) "Queue::Pop() called on an empty queue");

  /* Move "first" to point to the next node, store the return value, and
    delete the previous first node. */

  rv = first->s;
  oldfirst = first;
  first = oldfirst->ptr;
  delete oldfirst;

  /* Handle the empty queue. */

  if (first == NULL) last = NULL;

  /* Update size and return. */

  size--;
  return rv;
}
|
As with the stack code, we'll go over an example step by step:
 |
 |
 |
Pop() then returns "Give", its local variables go away, and then resulting Queue is:
 |
The code for Push() is quite different from the stack code. As before, we create a new node with new and set its string. However, we differ by setting the new node's ptr to NULL. Then we have to do two different things depending on whether the queue was previously empty. If it was empty, then we set first and last to the new node. Otherwise, we set the last element's ptr to the new node, and then set last to be the new node. In that way, the new node goes after the last element. Here is the code:
/* Push() creates a new node and then puts it at the end of the queue,
   by having the last node point to it.  We need special case
   code for when the queue is empty. */

void Queue::Push(const string &s)
{
  Qnode *newnode;

  newnode = new Qnode;      // Create the new node.
  newnode->s = s;
  newnode->ptr = NULL;

  if (last == NULL) {       // If the queue is empty, set first to be this new node.
    first = newnode;
  } else {                  // If the queue is non-empty, set the pointer of the last node to be this new node.
    last->ptr = newnode;
  }

  last = newnode;           // Finally, set last to point to the new node, and increment size.
  size++;
}
|
Below is an example of calling Push("Now") on the two element list above:
 |
 |
 |
When it returns, newnode goes away, and the resulting queue is:
 |
Clear(), Empty(), Size(), the regular constructor and the destructor are all straightforward. I'll visit the assignment overload and copy constructor below. To test this, let's implement tail with a queue. Go ahead and simply read the comments in src/queue_tail.cpp:
/* This program implements tail using a queue.  It reads lines of standard input
   into the queue, and once the queue reaches ten elements in size, then every
   time a line is pushed onto the end of the queue, a line is popped off the front.
   At the end, the queue is printed. */

#include "queue.hpp"
#include <iostream>
using namespace std;

int main()
{
  string s;
  Queue q;

  /* Read the lines into the queue, and keep it at a maximum of 10 elements. */

  while (getline(cin, s)) {
    q.Push(s);
    if (q.Size() > 10) (void) q.Pop();
  }

  /* Print the queue. */

  while (!q.Empty()) cout << q.Pop() << endl;
  return 0;
}
|
As with stack_rev.cpp, this is a really straightfoward program, because the data structure fits the task so nicely. We can verify that it works, both when it receives more than ten lines, and less:
UNIX> make clean
rm -f obj/* bin/*
UNIX> make bin/queue_tail
g++ -std=c++98 -Wall -Wextra -Iinclude -c -o obj/queue_tail.o src/queue_tail.cpp
g++ -std=c++98 -Wall -Wextra -Iinclude -c -o obj/queue.o src/queue.cpp
g++ -std=c++98 -Wall -Wextra -Iinclude -o bin/queue_tail obj/queue_tail.o obj/queue.o
UNIX> wc txt/input.txt
      20      63     423 txt/input.txt
UNIX> tail txt/input.txt
10  Brayden Clarinet
11  Nicholas Casteth
12  Hunter Hart
13  Ellie Bangle
14  Addison Fracture
15  Ava Hereafter
16  Evelyn Kigali
17  Tristan Housewives
18  Jack Bodybuilder
19  Gabriel Millionth
UNIX> bin/queue_tail < txt/input.txt
10  Brayden Clarinet
11  Nicholas Casteth
12  Hunter Hart
13  Ellie Bangle
14  Addison Fracture
15  Ava Hereafter
16  Evelyn Kigali
17  Tristan Housewives
18  Jack Bodybuilder
19  Gabriel Millionth
UNIX> head -n 3 txt/input.txt
 0  John Eighth
 1  Tristan Passenger
 2  Joshua Classroom
UNIX> head -n 3 txt/input.txt | bin/queue_tail
 0  John Eighth
 1  Tristan Passenger
 2  Joshua Classroom
UNIX>
As with the Stack data structure, we need to implement a copy constructor and assignment
overload. This assignment overload is more simple, because you can simply
Push() each node on the queue,
from front to back. The copy constructor, like the one for stacks, uses the assignment
overload.
Here's the code:
/* The assignment overload first clears out any state that the queue has, so that
   it's an empty queue.  Then it traverses q's nodes and pushes each one. */

Queue& Queue::operator= (const Queue &q)
{
  Qnode *tmp;

  Clear();
  for (tmp = q.first; tmp != NULL; tmp = tmp->ptr) Push(tmp->s);
  return *this;
}

/* We're going to use the assignment overload to implement the copy constructor, but
   remember, when the copy constructor is called, all of the member variables (size, first
   and last) are uninitialized.  So, we need to set up enough of the member variables for
   the assignment overload to work.  The first thing that the assignment oveload does is
   call Clear(), and you'll note that the only member variable that Clear() accesses is
   first.  So, setting up first to be NULL is the only thing that we need to do before
   calling the assignment overload.  */

Queue::Queue(const Queue &q)
{
  first = NULL;
  *this = q;
}
|
To test, the programs src/queue_overload.cpp and src/queue_copy.cpp work just like their stack counterparts. src/queue_overload.cpp reads standard input into a queue, assigns a second queue to equal the first, clears the first and then prints the second. If correct, standard input should equal standard output:
UNIX> cat txt/input.txt | openssl md5
(stdin)= 5fddce6788199e7a51227f78a9f3bb4f
UNIX> bin/queue_overload < txt/input.txt | openssl md5
(stdin)= 5fddce6788199e7a51227f78a9f3bb4f
UNIX>
src/queue_copy.cpp calls a procedure to print the queue, which makes a copy. It does it twice, so you should see the input twice (with an extra newline at the end):
UNIX> head -n 2 txt/input.txt
 0  John Eighth
 1  Tristan Passenger
UNIX> head -n 2 txt/input.txt | bin/queue_copy
 0  John Eighth
 1  Tristan Passenger

 0  John Eighth
 1  Tristan Passenger

UNIX>
Doubly-Linked Lists
The most general-purpose list data structure is the doubly linked list. It is how the list part of the STL is implemented. The nice features of doubly-linked lists are that they may be traversed in the forward and reverse direction, they allow for arbitrary insertion of nodes anywhere in the list, and they allow for arbitrary deletion of any nodes. Our API for the doubly linked list is in include/dlist.hpp:
#pragma once
#include <string>

class Dnode {
  friend class Dlist;
  public:
    std::string s;
    Dnode *Next();
    Dnode *Prev();
  protected:
    Dnode *flink;
    Dnode *blink;
};

class Dlist {
  public:

    /* Constructors, Destructor, Assignment Overload */

    Dlist();
    Dlist(const Dlist &d);
    Dlist& operator= (const Dlist &d);
    ~Dlist();

    void Clear();          // This should not delete the sentinel node.
    bool Empty() const;
    size_t Size() const;

    /* Put new strings on the front or back of the list */

    void Push_Front(const std::string &s);
    void Push_Back(const std::string &s);

    /* Remove and return the first or last element of the list */

    std::string Pop_Front();
    std::string Pop_Back();

    Dnode *Begin() const;         // Pointer to the first node on the list
    Dnode *End() const;           // Pointer to "one past" the last node on the list.
    Dnode *Rbegin() const;        // Pointer to the last node on the list
    Dnode *Rend() const;          // Pointer to "one before" the first node on the list.

    void Insert_Before(const std::string &s, Dnode *n);
    void Insert_After(const std::string &s, Dnode *n);
    void Erase(Dnode *n);

  protected:
    Dnode *sentinel;
    size_t size;
};
|
All of these methods should be familiar to you, as they are analogous to STL methods. (Although in the STL, pop_back() and pop_front() don't actually return the values.)
There are two simple implementations of reversing standard input in src/dlist_rev_1.cpp and src/dlist_rev_2.cpp. The first works by calling Push_Back() and Pop_Back(), and the second works by calling Push_Front() and Pop_Front().
A little more subtle is src/dlist_rev_3.cpp, which creates the list using Push_Front(), and then traverses it using Begin(), End() and the Next() method of the Dnode:
#include "dlist.hpp"
#include <iostream>
using namespace std;

int main()
{
  string s;
  Dlist l;
  Dnode *d;

  while (getline(cin, s)) l.Push_Front(s);
  for (d = l.Begin(); d != l.End(); d = d->Next()) cout << d->s << endl;
  return 0;
}
|
That for loop looks very STL-like, except Begin() and End() don't return iterators. They return a pointer to the list node, which contains a public member variable and two public methods:
- The string s. You can do whatever you want with this string.
- A Next() method, which returns a pointer to the next node on the list.
- A Prev() method, which returns a pointer to the previous node on the list.
In a similar manner, in src/dlist_rev_4.cpp, the list is created with Push_Back(), and we traverse it from back to front using Rbegin(), Rend() and d->Prev():
#include "dlist.hpp"
#include <iostream>
using namespace std;

int main()
{
  string s;
  Dlist l;
  Dnode *d;

  while (getline(cin, s)) l.Push_Back(s);
  for (d = l.Rbegin(); d != l.Rend(); d = d->Prev()) cout << d->s << endl;
  return 0;
}
|
Alternatively, in src/dlist_rev_5.cpp, we create the list with Push_Front() and print it by repeatedly printing the first element and then erasing it:
#include "dlist.hpp"
#include <iostream>
using namespace std;

int main()
{
  string s;
  Dlist l;

  while (getline(cin, s)) l.Push_Front(s);
  while (!l.Empty()) {
    cout << l.Begin()->s << endl;
    l.Erase(l.Begin());
  }
  return 0;
}
|
And finally, in src/dlist_rev_6.cpp, , we use the Insert_Before() method, which inserts a new node before the given node, to create the list in a manner equivalent to Push_Back(). We do this by inserting before End(). We then traverse the list from back to front.
#include "dlist.hpp"
#include <iostream>
using namespace std;

int main()
{
  string s;
  Dlist l;
  Dnode *d;

  while (getline(cin, s)) l.Insert_Before(s, l.End());
  for (d = l.Rbegin(); d != l.Rend(); d = d->Prev()) {
    cout << d->s << endl;
  }
  return 0;
}
|
Circular Lists with a Sentinel
I'm not going to implement src/dlist.cpp for you. That's your job in lab. However, I will outline the structure, which may seem convoluted at first, but will seem elegant and beautiful by the time you're done with it.First, our Dnode data structures contain two protected pointers:
- flink points to the next node in the list. The Next() method simply returns d->flink.
- blink points to the previous node in the list. The Prev() method simply returns d->blink.
Last, our list is going to be circular. This means that the flink field of the last node in the list points to the sentinel, and the blink field of the first node also points to the sentinel. This may seem confusing, so let's look at an example. Suppose we do:
Dlist l;

l.Push_Back("Give");
l.Push_Back("Him");
l.Push_Back("Six");
|
Then our list looks as follows:
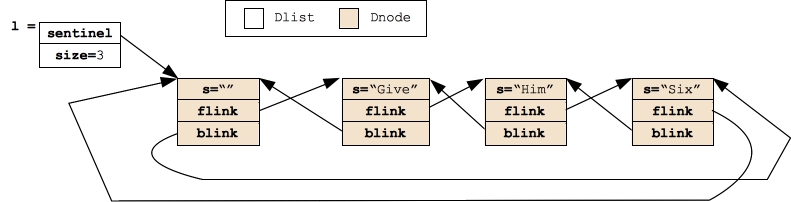 |
Think about traversing such a list. Typically, a student's first response to this structure is, "How do I keep from getting into an infinite loop when I'm traversing?" The answer is that you end when you reach the sentinel node. Consider the loop from src/dlist_rev_3.cpp
for (d = l.Begin(); d != l.End(); d = d->Next()) cout << d->s << endl; |
l.Begin() is going to return sentinel->flink, and l.End() is going to return sentinel. Thus, executing this loop on the list above will indeed print out "Give", then "Him", and then "Six". At the last iteration of the loop, the pointer d will be pointing to the sentinel, and the loop will end.
Study that code and the picture above until you understand it.
When the constructor for a list is called, it is going to allocate a sentinel node and have its flink and blink pointers point to itself:
 |
That means you are going to have to call new in the constructor. Consider the previous for loop executing on the empty list. Since sentinel->flink is equal to sentinel, the body of the loop is never executed. That's just what you want!
Insertion
Suppose I want to insert a new node before a given node in the list. For example:
Dlist l;
Dnode *d;

l.Push_Back("Give");
l.Push_Back("Six");
d = l.Begin();
d = d->Next();
l.Insert_Before("Him", d);
|
At the point of the Insert_Before() statement, here's the state of the program:
 |
In Insert_Before(), we'll have two (Dnode *)'s called prev and newnode. We'll set prev to d->blink and set newnode equal to a newly allocated Dnode with the proper string:
 |
Now we can hook newnode into the list by appropriately setting its flink and blink pointers, and by appropriately setting prev->flink and d->blink. When we're done, the new node is hooked into the list:
 |
Insert_Before() returns to the caller, which means that newnode and prev go away, and the list is as we want it:
 |
Since the list is circular, you can insert new nodes between the sentinel and the last node on the list. What will that do? That will effect Push_Back()! In fact, you can implement each of Push_Back(), Push_Front(), and Insert_After with Insert_Before(). Isn't that convenient.
Deletion
First, you should never allow deletion of the sentinel. If you do, you'll be in a world of hurt... Deleting other nodes is a straightforward affair, much like insertion. Consider the following code:
Dlist l;
Dnode *d;

l.Push_Back("Give");
l.Push_Back("Him");
l.Push_Back("Six");
d = l.Begin();
d = d->Next();
l.Erase(d);
|
At the point of the Erase() call, the state of the program is:
 |
As before, in Erase(), we'll have two (Dnode *)'s, this time called prev and next. We set them to the two nodes surrounding d:
 |
We can then remove d from the list by setting next's blink pointer and prev's flink pointer:
 |
And calling delete on d (and decrementing size):
 |
When Erase() returns, the node is gone, as are prev and next. The variable d is now pointing to deleted memory, you should should take care not to use it.
 |
As with Insert_Before(), you can use Erase() to implement other methods like Pop_Back() and Pop_Front().
Clear, The destructor, The assignment overload and the copy constructor
Clear() is a little different from the stack and queue versions. The reason is that Clear() should erase all nodes but the sentinel. That means that the destructor needs to do more than just call Clear() -- it will have to delete the sentinel, too.
Remember that when the assignment overload is called, it will hold a (potentially non-empty) list. You'll need to clear it before copying the list from which you are doing the assignment.
Similarly, remember that when the copy constructor is called, nothing is initialized, so you'll have to create the sentinel node, and then you can do the copy. It's fine for both of these to call Push_Back() to do the copying;