cp ~cs102/robot_labs/Lab_Skeletons/Lab10a/makefile .
cp ~cs102/robot_labs/Lab_Skeletons/Lab10a/panoramic.o .
cp ~cs102/robot_labs/Lab_Skeletons/Lab10a/panoramic.h .
cp ~cs102/robot_labs/Lab_Skeletons/Lab10a/panoramic_example .
/home/cs102/robot_labs/Lab_Skeletons/Lab10a/panoramic
In this lab you'll take a series of pictures with your robot, analyze the pictures for overlapping areas, then stitch them together and display them as a panorama. This lab will not be part of the Navigator class.
There are several ways to solve this problem, and you may already be familiar with photo editing software that constructs panoramas. For this lab, you'll be instructed through one of the simpler, yet effective, methods of solving this problem.
Remember that the data for a picture is stored in a Picture objected. More percisely for this lab each picture is stored in a ColorPicture object. The following, code snipets cover creating ColorPicture objects, and their respective member functions. (Note: You will only need to create one ColorPicture, and that will be the panoramic Picture that you are returning from buildImage)
You will write the function, buildImage, to stitch the images together. You will be given an array of pictures and the points where they best overlap. The function prototype looks like below and can also be found in panoramic.h . Implement this code into a new file named panermaic_buildimage.cpp
Picture * buildImage(vector<Picture*> imageArray, vector< pair<int,int> > overLap, int& final_width);
The first argument is a pointer pointer--this acts as an array of pointers, where each pointer points to an image(Picture) that will be used to construct the panorama. The second, third, and forth arguments are the number of pictures in the array, the width of each picture in the panorama, and the height of each picture in the panorama, respectively. The fifth argument is a vector of pairs. In each pair, the first integer represents the column number of the left hand picture that matches up with the column number indicated by the second integer in the right hand picture. There is a pair for each seam in the panorama. The last argument is the address of the final_width variable. The final_width will be calculated in this function, and will be used outside this function. This means that we either pass the final_width variable by pointer or by reference. To make life easier the final_width variable is passed by reference. If you don't remember pass by reference, consult your cs102 class notes.
The buildImage function should:
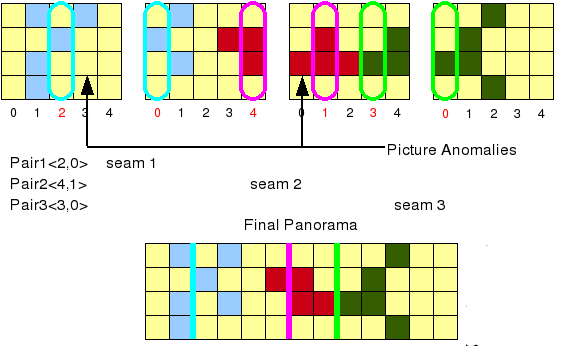
Consider the diagram below to help you figure out how to build the image. This example picture array has four pictures, each with a width of 5 "pixels". The pairs are found in such a way that it is possible that any column in one picture can match with any column in another. An example of this case is illustrated with seam 2 of the figure. Column zero of Picture C contains a "Picture Anomaly," possibly a trick of light makes the two columns different, so the columns with the best intensity match are <4,1>. A similar thing happens over seam 1. Next week you'll deal with how to find the "right" matches, but for now consider that work already done.