Creating a movement from scratch - Part 2
VERY IMPORTANT: FOR ALL STEPS, YOU MUST HAVE SOMEONE "SPOT" THE ROBOT, MEANING THAT THE SPOTTER
IS ACTIVELY READY TO CATCH THE ROBOT IN CASE IT STARTS TO FALL.
You can create your own movement in Nao from scratch. We will step
through the details of creating a small movement involving the hands,
arms, and head of the Nao.
- Open Choregraphe by opening a terminal and typing choregraphe.
- During our movement, we want the Nao to be standing, so the first
thing we should do is add a Stand Up motion. In the box list on the
left side of the Choregraphe window, select Motions -> Stand Up and
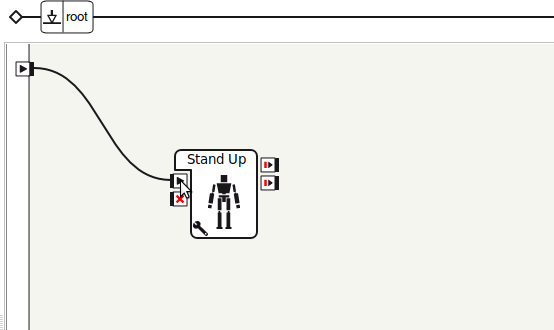
then drag and drop it onto the flow diagram panel. Notice that there are
several inputs and outputs to the stand up box, as well as a wrench.
Clicking on a wrench in the box allows you to set parameters for that
box. For Stand Up, the parameter is how many times the Nao should try
to stand up before giving up. The default parameter is 3, which is fine
for us, so we will not change it. Mouse over the different input and
output options to see their tool-tips.

- Connect Stand Up's onStart input to the main onStart.
- We also want to the Nao to finish in a sitting position, so we need
to add a Sit Down box. We do that by selecting Motions -> Sit Down
and dragging and dropping it onto the flow diagram in the same way as
the stand up box. Then, we connect Sit Down's onStopped outputs to the
main onStopped output.

- Save the current Choregraphe movement by clicking on File -> Save
project. Save the project as scratchmovement2. Save your work
frequently in Choregraphe.
- Both stand up and sit down are pre-made movements in Choregraphe.
We will now make a movement from scratch. From the box list, select
Templates -> Animation and drag and drop it onto the flow diagram
between stand up and sit down. Connect the success output of Stand up
to the onStart input of Animation. Connect the onStopped output of
Animation to the onStart input of Sit Down.

- Double click on the Animation box to begin creating the movement from scratch.
- In this tutorial we will create a Nao movement by posing the Nao and
saving the posed movement, so we must connect to a Nao. Turn on your
desired Nao, wait for the Nao to be ready to connect, then connect to
that Nao using Choregraphe.
- SOMEONE MUST HOLD ONTO THE ROBOT CONTINUOUSLY DURING THE NEXT SEVERAL STEPS. You will move your Nao into a standing position by clicking on the
Stand position in the pre-made poses library. Be ready to help your Nao
into that position.
- On the motion section, select time 20. This will be the time of the
first movement. We could select any time greater than 1, but we cannot
select 1 because that would indicate that the Nao should be in that
position at the start of this box.
- If stiffness is enabled (the Enable/Disable stiffness button is
red), disable the stiffness by clicking on the Enable/Disable stiffness
button so that it becomes green. This will allow you to move the Nao
into a desired position. Move the Nao slowly, and do not force a
movement if there is resistance.
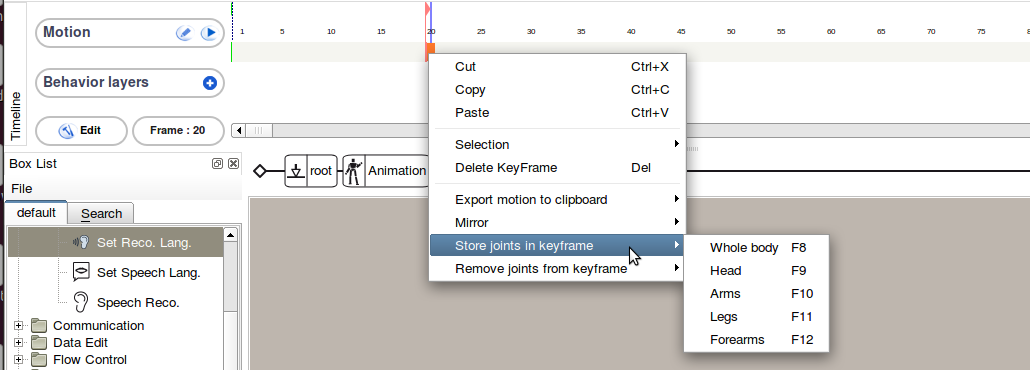
- Move one of the Nao's arms into a new position, and right click on
the timeline at time 20. Select Store joints in keyframe -> Arms to
store the joints position in the keyframe.
- If desired, click on later places in the timeline to store the
movements of other parts of the Naos body, such as the head. Before
attempting to move the Nao into another position, make sure that the
stiffness is disabled (check the color the Enable/Disable stiffness
button). If the stiffness is enabled, disable it by clicking the
button, but be aware that this may cause the Nao to fall or its arms to
fall.
- Once your desired movement is complete, return the Nao to a standing
pose using the pre-made poses library. Make sure stiffness is enabled.
- Press play to see the actual Nao robot perform the movement.