Synopsys Cocentric Homework
Written by Mahesh Dorai on 3/31/03 and adapted into a homework by James
M. McCollum on 3/23/04. Updated by Mo Zhang on 2/11/2005.
Overview Presentation (pdf)
The Synopsys System Studio offers a wide variety of modelling capabilities,
providing you with the means to capture complex systems quickly and efficiently.
Systems studio's models are broadly divided into two distinct domains
namely -
- Algorithmic
- Architectural
Algorithmic models describe the functionality of a system at an untimed
level. This homework is a starting step towards understanding the functioning
of Synopsys Cocentric. In this tutorial, we create data flow model, a type
of Algorithmic model.
Data Flow Models : Data flow graph models are a type of Algorithmic model.
These are data models in which the instances they contain communicate by
means of FIFO queues of data travelling on nets. The other algorithmic model
types are :
1. OR models
2. AND models
3. GATED models
4. PRIM models
5. SDS models
Architectural models capture the architecture of a system at various
levels of granularity and abstraction. These models allow you to describe
the overall platform architecture in terms of its buses,memories,processors
and ASIC content.
PART A
Creating a Model structure -
source the .cshrc file by typing - source ~cad/.cshrc
To invoke Synopsys tools, type - synopsys_tools
Before we create a model design, we must create:
- a workspace
- a library within the workspace
- a model within the library
To start System Studio, enter the following command: ccss
&
Creating a Workspace - Select File --› New from the System Studio
main menu bar. A dialog box appears. The Create Workspace dialog box, shown
in Figure 1is displayed. Enter the name of the workspace that you wish
to create. Click the Apply button. Don't click OK now.
Creating a Library - After you say Apply, the same window asks
for the library name. Type a library name under the workspace that you have
created. You can specify a different location for the library directory in
the Location field if you want to. After you enter a library name (or accept
the default name), click Apply. Again don't click OK.
Creating a Model - After you have clicked Apply, with the
In the Create Library dialog box, select a library and click the Model tab.
The dialog box changes to the Create Model dialog box, as shown in the
Figure. If you do not select a library, the Model tab will not be visible.

After you choose the model tab, choose the DFG option
from the options listed (figure shown below)
But when I first came to this page, there is no "DFG" option in the "model"
frame. So I click the plus sign (+) on the left of "cocentric" to expand the
"cocentric" library--> then clicked the plus sign (+) on the left of
the “algorithm” library --> then clicked the plus sign (+)
on the left of the “source” library-->then clicked on the "SinGenerator".
The "DFG" option appeared in the "model" frame. When I click my own library
, "hw_library", there will be the "DFG" option in the "model" frame.
Now, you click Apply and then OK. You would have observed that we can
choose from a variety of Algorithmic models for creating instances. If you
select an implementation, the Implementation view opens with the appropriate
type of implementation loaded (for example, for a primitive model a skeleton
source code file is opened).
The DFG model that we are going to create is a simple model that consists
of two blocks namely -
1. A sine wave generator &
2. A sink.
Both are existing models contained in the System Studio libraries. To
create the model schematic, 1. If the “cocentric” library is collapsed, expand
the library by clicking the plus sign (+) next to it in the Workspace window;
expand the “algorithm” library and then select the “source” library. Refer
the figure shown below.

Adding the SinGenerator to the Implementaion window -
Click the "Implementation" frame. Otherwise, the insert Instance button
does not work. Click "Insert" at the top of the windon-->select "Instance".
Select the SinGenerator model from "the “source” library located in the algorithm
library. Move the cursor into the design area. You will see the outline of
the block displayed as you move the cursor around. Click the left mouse button
when the outline of the block is positioned where you want to place the block.
The figure is shown below. Click the middle button of the mouse to disable
the insert instance option.

Inserting the sink or the Write signal block into the implementation
view - Select the WriteSignal block from the System Studio models “sink”
library located in the algorithm library. Position the WriteSignal
block to the right of the SinGenerator block, as shown in the figure and click
the left mouse button. Click the middle mouse button to cancel the insert
Instance function. The figure is shown below:

Connecting the two blocks by a net - The next step is to connect
the two blocks together with a net. Click the Insert Net button in the Schematic
toolbar. Position the cursor over the output port of the SinGenerator block.
Press and hold the left mouse button, and create a net by dragging a line
to the input port of the WriteSignal block. Release the mouse button. The
two blocks are now connected as shown in the figure below. Click the middle
mouse button to cancel the Insert Net function.

Capture a screen shot of your data flow model and
add it to you homework report.
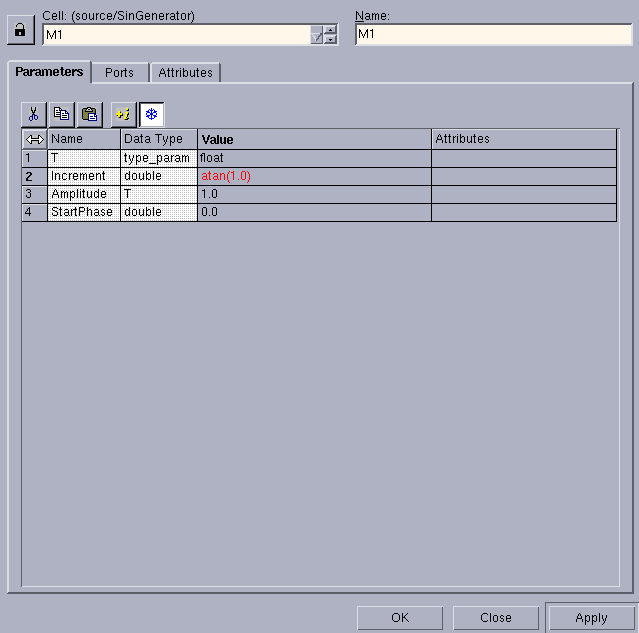
Parametrizing the blocks - To finish the design, the blocks have
to be parameterized. Position the mouse pointer over instance M1 (the SinGenerator
model) and click the right mouse button. Choose Configure Object from the
context-sensitive menu. The Configure Objects dialog box is displayed as
shown in the figure below. Assign the expression atan(1.0) to the parameter
“Increment” for the SinGenerator instance M1, and click OK. The schematic
design is now complete. For our convenience, some of the parameters have
default values (for example, in this model the WriteSignal instance is completely
configured by the default parameter values. So we don't need to modify the
values of the Write Signal block).
Simulating the models - You can create the executable simulation
either automatically or manually. We first pick our simulation tool. We
will be using the Cocentric data visualization tool (DAVIS) to enable
us to visually analyze and graphically display data. It also has the ability
to interact with a System Studio simulation.
Starting DAVIS - Select -->Tools-->DAVIS. This opens the
DAVIS tool.
Go back to the Cocentric System Studio Window and select --> Simulation-->Simulate
Model. All the steps will be performed automatically. These steps include
creating the optimized executable code, compiling and linking the model,
and starting the simulation in pause mode.
After a few seconds, you will get a message box as shown in the figure.
Click OK and proceed to the DAVIS window.
Linking DAVIS and the earlier run Simulation - Now in the "DAVIS"
work window, select -->File-->Open Simulation. Choose the model from
the list of running or completed simulations. Make sure that you have selected
the active simulation. The DatasetID on the right hand side of the dialogue
box must have a value. Refer to the figure shown below. Click Apply and OK
when you are ready.
Viewing the Output - When you have clicked Apply, you will observe
the output on the graph page/sheet. You may choose to view the waveform
on a smaller scale by selecting --View-->Zoom Area--> and giving suitable
values.

Capture a screen shot of your output plot and add
it to you homework report.
Now switch to your home directory and change directories to the "ccss"
directory. Notice that in this directory you will find the System C files
build from your model.
Note - If you want to create a new workspace, you first have
to close the exisitng workspace by choosing--> Select-->File-->close
workspace.
You can now create a new workspace by choosing Select-->File-->New
If you want to reopen your existing workspace, choose--> Select-->File-->Open
workspace--> click the "*.ssw", your workspace file.
PART B
Create a new data flow using the same steps used in part A. Your new data
flow must contain at least five data blocks.
Capture a screen shot of your data flow model and
your output plot. Add it to you homework report.
Acknowledgements & References -
[1]. CoCentric System Studio Overview
[2]. Getting Started with System Studio (271-page pdf; see Chapter 3)
[3]. SystemC Libraries (2-page pdf)
[4]. System Studio Reference Design Kits
[5]. Synopsys Technical Support center - ccss_support@synopsys.com
[6]. Dr. Chandra Tan, Microelectronics Systems Research, University of Tennessee