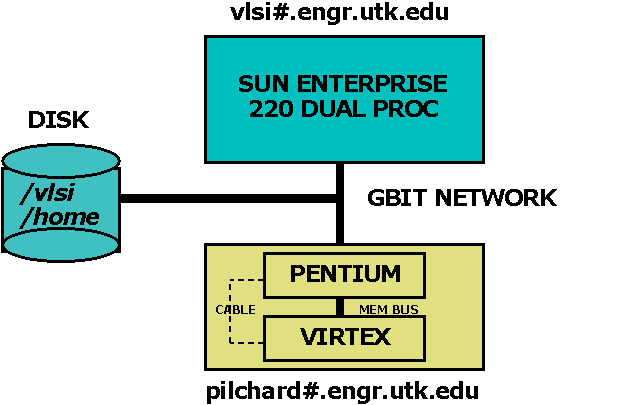
LAB Environment:

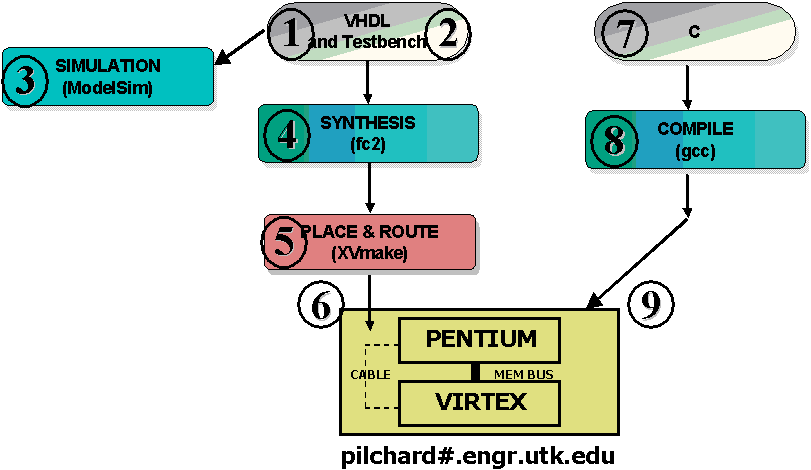
Implementation Procedure:

Hierarchy of Modules:

SETUP: 1. mkdir 552hw2 2. cp /usr/cad/course/pilchard-tut.tar.gz 552hw2 3. cd 552hw2 4. gunzip pilchard-tut.tar.gz; tar -xvf pilchard-tut.tar; cd pilchard-tut; chmod u+x compile
SUMMARY OF FILES AND STEPS: COMPOSE: -------- pilchard.vhd pcore.vhd parith.vhd dpram256_64.vhd tb.vhd stim.do wave.do COMPILE AND SIMULATE: --------------------- compile SYNTHESIZE: ----------- dpram256_64.edn syn.fc2 PLACE AND ROUTE: ---------------- iob_fdc.edif pilchard.ucf XVmake COMPOSE AND COMPILE C CODE: --------------------------- iflib.c iflib.h iftest.c
COMPILE AND SIMULATE: --------------------- 5. compile (Execute "compile".) You should see this on the screen. This script will compile all of the vhd files and also start the modelsim window to show the simulations for the whole design. Here you can observe the signals in pcore.vhd, parith.vhd and dpram256_64.vhd. Please note that we never compile the file pilchard.vhd here so do not try to compile pilchard.vhd. In the wave window, EDIT-->SELECT-ALL to highlight all of the signals and then FORMAT-->RADIX-->HEX to convert the values into hexadecimal. Scroll down the waveform window to see all of the signals of all the modules: Parith and Testbench RAM and Pcore As you can see the OR operation is performed in the arithmetic module (parith.vhd) and the result can been seen in "ans" signal . When finished, go to the main window and type: quit -f
SYNTHESIZE: ----------- Notice that the script "syn.fc2" contains the following lines: add_file -library WORK -format VHDL pcore.vhd add_file -library WORK -format VHDL pilchard.vhd add_file -library WORK -format VHDL parith.vhd add_file -library WORK -format EDIF dpram256_64.edn The dpram has been previously synthesized using the Xilinx CoreGen into "dpram256_64.edn" so the synthesis tool treats this component as a black box. In other words, it does not know the underlying functionality of this component. Now, execute the synthesis script "syn.fc2" to create an edif called "pilchard.edf" in a subdirectory called "export_dir". 6. synopsys_tools; fc2_shell -f syn.fc2 NOTE: The synthesis script will generate some warnings that you can safely ignore. Now we need to copy some more files into the subdirectory export_dir: 7. cp pilchard.ucf export_dir 8. cp iob_fdc.edif export_dir 9. cp dpram256_64.edn export_dir 10. cp XVmake export_dir 11. cd export_dir
PLACE AND ROUTE: ---------------- We now need to perform place and route on the flattened design (ngd = Native Generic Database). To learn more about ngd files, click on: NGD-BUILD To learn more about the mapping options, click on: Xilinx Map 12. xilinx_tools; XVmake pilchard Note: This step takes about 10 minutes. Optional: xilinx_tools; fpga_editor pilchard_r.ncd & (to view layout) 13. bitgen pilchard_r.ncd -w pilchard.bit
TRANSFER TO PILCHARD: --------------------- Login to a Pilchard machine by typing: 14. ssh pilchard2.engr.utk.edu NOTE: If you have any difficulty, contact Scott Fields via email at sfields1@utk.edu or on the phone at 974-5414 or in the 339 SERF lab. After using the password you have been given in class, change it to a new value. 15. passwd 16. mkdir ortest The pilchard is setup so that you can access the files from your home directory. When you login, you will find two directories in your login namely- (i) vlsi@ (ii) tmp The vlsi directory is an absolute mirror image of your files when logged into faster.engr.utk.edu Copy the following files but substitute your own username path for "bouldin/spr03/552/hw/552hw2/pilchard-tut/": 17. cp /vlsi/home/bouldin/spr03/552/hw/552hw2/pilchard-tut/export_dir/pilchard.bit ortest 18. cp /vlsi/home/bouldin/spr03/552/hw/552hw2/pilchard-tut/iflib.h ortest 19. cp /vlsi/home/bouldin/spr03/552/hw/552hw2/pilchard-tut/iflib.c ortest 20. cp /vlsi/home/bouldin/spr03/552/hw/552hw2/pilchard-tut/iftest.c ortest 21. cd ortest 22. [bouldin@pilchard2 ortest]$ ll total 824 -rw-r--r-- 1 bouldin mschip 757 Feb 7 19:26 iflib.c -rw-r--r-- 1 bouldin mschip 274 Feb 7 19:26 iflib.h -rw-r--r-- 1 bouldin mschip 1227 Feb 7 19:26 iftest.c -rw-r--r-- 1 bouldin mschip 823517 Feb 7 19:25 pilchard.bit
COMPOSE AND COMPILE C CODE: --------------------------- Now compile these C files by typing: 23. gcc -o iftest iftest.c iflib.c This will create an executable called "iftest" (InterFace Test). -rwxr-xr-x 1 bouldin mschip 14928 Feb 7 19:27 iftest*
DOWNLOAD AND EXECUTE: --------------------- Now download the bit file into the Pilchard board by typing: 24. download pilchard.bit Execute the compiled C code by typing: 25. ./iftest Make a screen snapshot. [bouldin@pilchard2 ortest]$ download pilchard.bit pilchard_r.ncd v1000ehq240 2004/03/09 18:19:28 cable detected configuration memory cleared start loading 823440 bytes finish loading DONE! [bouldin@pilchard2 ortest]$ ./iftest d0 :fefe00aa, ffff0000 d1 :11110000, 00001111 ans:ffff00aa, ffff1111 reg:00000000, 00000000 [bouldin@pilchard2 ortest]$ 26. exit
Xilinx Dual Port RAM Tutorial
Written by Mahesh Dorai and Chandra Tan on 1/30/03 1. Type "com" to compile all the required files. 2. Type "vsim testbench & " 3. Run the design for some duration to observe the results. The zip file for the tutorial contains: (1) ram64_256.vhd - (RAM Module) (2) design_top.vhd - ( Wrapper for the RAM module) (3) design_tb.vhd - (Test Bench for the design) (4) com - Compilation scriptPilchard Tutorial by Venky Bhaskar
Link your results to your restricted webpage.